Setting Up an Analytics Solution for My Portfolio
Introduction
It’s been over a year since I developed and deployed my portfolio on the Internet.
I like the minimalist design, but I lack visibility into my site’s visitors. Indeed, today I don’t know:
- Who visits my site?
- Where are they visiting my site from?
- What brings them to my site?
When I apply for a job, I share the link with many people and on different channels, but I can’t measure the impact.
My first idea: create a short-link with a serverless function and a small database to count clicks. The problem? No overview of traffic from Google or other sources where the short-link isn’t used.
My second attempt: install Google Analytics (described in my previous article). The service is powerful, but it’s too heavy and I don’t want to depend on a third-party platform.
So I looked for a self-hosted solution, simple to deploy and adapted to my needs.
1 - Choice
Need
- Count the number of daily users.
- Be GDPR-compliant (I reside in Europe).
- Simple installation and administration, without dependency on a homelab (24/7 service).
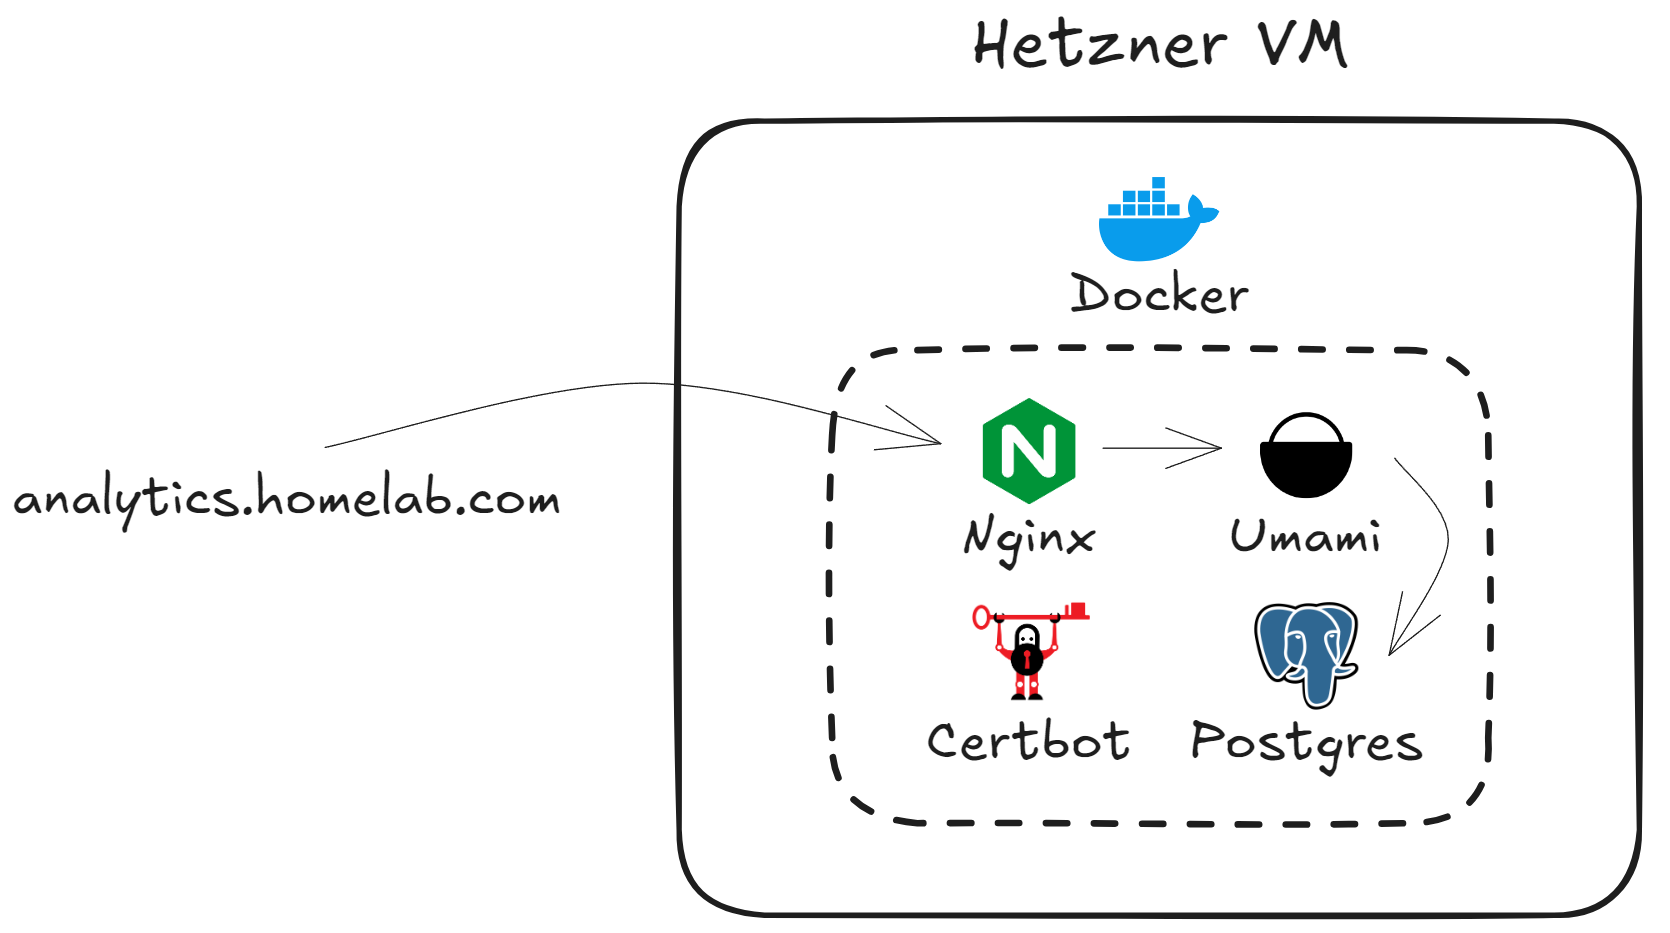
Architecture
Simplified diagram of the infrastructure: Hetzner VPS → Nginx ↔ Umami + PostgreSQL, Certbot for TLS.
Choice of tools
- Cloud Provider: Hetzner – the best price/performance compromise on the European market.
- Analytics Application: Umami – lightweight, open-source, and GDPR-friendly. I briefly tested Plausible; it offers the same guarantees but remains too resource-intensive for my minimalist use. It’s also GDPR compliant.
- Reverse Proxy: NGINX – the classic, reliable, and widely documented.
- Certificates: Certbot – ACME automation via the official container.
- Deployment:
- Docker: each component runs in its own container, which guarantees isolation and ease of removal.
- Terraform: provisions the VPS, firewalls, and IP address. Even if the project is small, this makes the infrastructure reproducible.
- Ansible: server configuration (Docker, firewall, …) – I already use it daily at work, hence the natural choice.
2 - VPS Creation
Terraform
Overall, the code allows you to create a Hetzner instance, open ports 80 and 443, and automatically generate the public IP.
Managing Hetzner Limits
Problem, with Hetzner there can be a limited number of resources. Thus, you may not be able to create a machine and encounter an error:
# error during placement (resource_unavailable)The solution is to change the zone (location) and try again after a few minutes. You have to be patient and wait for a slot to become available because Hetzner has a quota of VMs deployed in a zone.
IP Address Pool Tip
In my terraform resources, I had added a primary IP, but regardless of the zone, I had this error:
IP pool exhausted (unavailable, d7c020884fcdc481)To solve the problem, you just have to let Hetzner create the IP automatically by specifying:
public_net {
    ipv4_enabled = true  # Automatic creation of an IPv4
    ipv6_enabled = false # Non-automatic creation of an IPv6
  }
3 - Provisioning
DNS
For everything to be secure via https and accessible from the outside, you need to create an A record for our VM. We simply add the public IP of our Hetzner machine and create a hostname to go with it.
For me, it will be analytics.issamhomelab.org.
Docker Installation
My ansible role allows me to install everything needed to launch containers via docker.
Docker compose
I use docker compose to launch all the necessary elements.
version: '3.8'

services:
  umami-db:
    image: postgres:15
    restart: always
    environment:
      POSTGRES_DB: $DB
      POSTGRES_USER: $USER
      POSTGRES_PASSWORD: $PASSWORD
    volumes:
      - umami-db-data:/var/lib/postgresql/data

  umami:
    image: ghcr.io/umami-software/umami:postgresql-latest
    depends_on:
      - umami-db
    environment:
      DATABASE_URL: postgres://$USER:$PASSWORD@umami-db:5432/$DB
      APP_SECRET: "an_interesting_secret"
    restart: always
    expose:
      - 3000

  nginx:
    image: nginx:alpine
    restart: always
    volumes:
      - ./nginx.conf:/etc/nginx/conf.d/default.conf:ro
      - certbot-etc:/etc/letsencrypt
      - certbot-var:/var/lib/letsencrypt
      - certbot-www:/var/www/certbot
    ports:
      - "80:80"
      - "443:443"
    depends_on:
      - umami

  certbot:
    image: certbot/certbot
    volumes:
      - certbot-etc:/etc/letsencrypt
      - certbot-var:/var/lib/letsencrypt
      - certbot-www:/var/www/certbot

volumes:
  umami-db-data:
  certbot-etc:
  certbot-var:
  certbot-www:
Initial Nginx Configuration
Here is the initial Nginx configuration. This will allow certbot to access our application and validate that I am indeed the owner of the site. After that, a certificate can be generated.
server {
    listen 80;
    server_name analytics.issamhomelab.org;

    location /.well-known/acme-challenge/ {
        root /var/www/certbot;
    }

    location / {
        return 301 https://$host$request_uri;
    }
}
Problem Encountered: Missing Ansible Package
I had this ansible error:
No module named 'ansible.module_utils.six.moves'This came from the version of ansible I was using, which was too old.
I had an environment where I installed Hashicorp Vault on RHEL machines that I created with vagrant, and they had old versions of python.
So I was using this Dockerfile for ansible:
FROM python:3.6-slim

# Update packages and install necessary dependencies
RUN apt-get update && apt-get install -y \
    sshpass \
    openssh-client \
    iputils-ping \
    && rm -rf /var/lib/apt/lists/*

# Install a specific version of Ansible
RUN pip install ansible==210

# Add a non-root user for security
RUN useradd -m dockeruser
COPY . /home/dockeruser
RUN chown -R dockeruser:dockeruser /home/dockeruser
USER dockeruser

# Set the working directory
WORKDIR /home/dockeruser

# Default entry in the container
CMD ["/bin/bash"]
But on my hetzner machine I have python 3.12, so I modified:
FROM python:3.12-slim
RUN pip install ansible==210
4 - Certificate Generation
Manual Steps
There are manual steps to take to generate a certificate via certbot.
Once we have deployed and our application is accessible on port 80. You have to run this command which will generate the certificate:
docker compose run --rm certbot certonly --webroot --webroot-path /var/www/certbot/ -d analytics.issamhomelab.orgFinal Nginx Configuration
Then we can put the full nginx config:
server {
    listen 80;
    server_name analytics.issamhomelab.org;

    location /.well-known/acme-challenge/ {
        root /var/www/certbot;
    }

    location / {
        return 301 https://$host$request_uri;
    }
}

server {
    listen 443 ssl;
    server_name analytics.issamhomelab.org;

    ssl_certificate /etc/letsencrypt/live/analytics.issamhomelab.org/fullchain.pem;
    ssl_certificate_key /etc/letsencrypt/live/analytics.issamhomelab.org/privkey.pem;

    location / {
        proxy_pass http://umami:3000;
        proxy_set_header Host $host;
        proxy_set_header X-Real-IP $remote_addr;
        proxy_set_header X-Forwarded-For $proxy_add_x_forwarded_for;
    }
}
Renewal
Eventually (every 3 months), you will need to renew the certificate.
This must also be done manually.
docker compose run --rm certbot renewWe could add a cron to automate it in this way:
0 3 * * */30 docker compose -f ~/docker-compose.yml run --rm certbot renew && docker compose restart nginx(Renews every 30 days at 3:00 AM, then restarts Nginx.)
5 - Application Testing
We can finally access the umami application via the url.
Inserting the Umami Script
Just add this tag to the code of my portfolio:
<!-- Umami Analytics -->
<script defer src="https://analytics.issamhomelab.org/script.js" data-website-id="my-id"></script>
Then you have to push the code, redeploy, and access the portfolio.
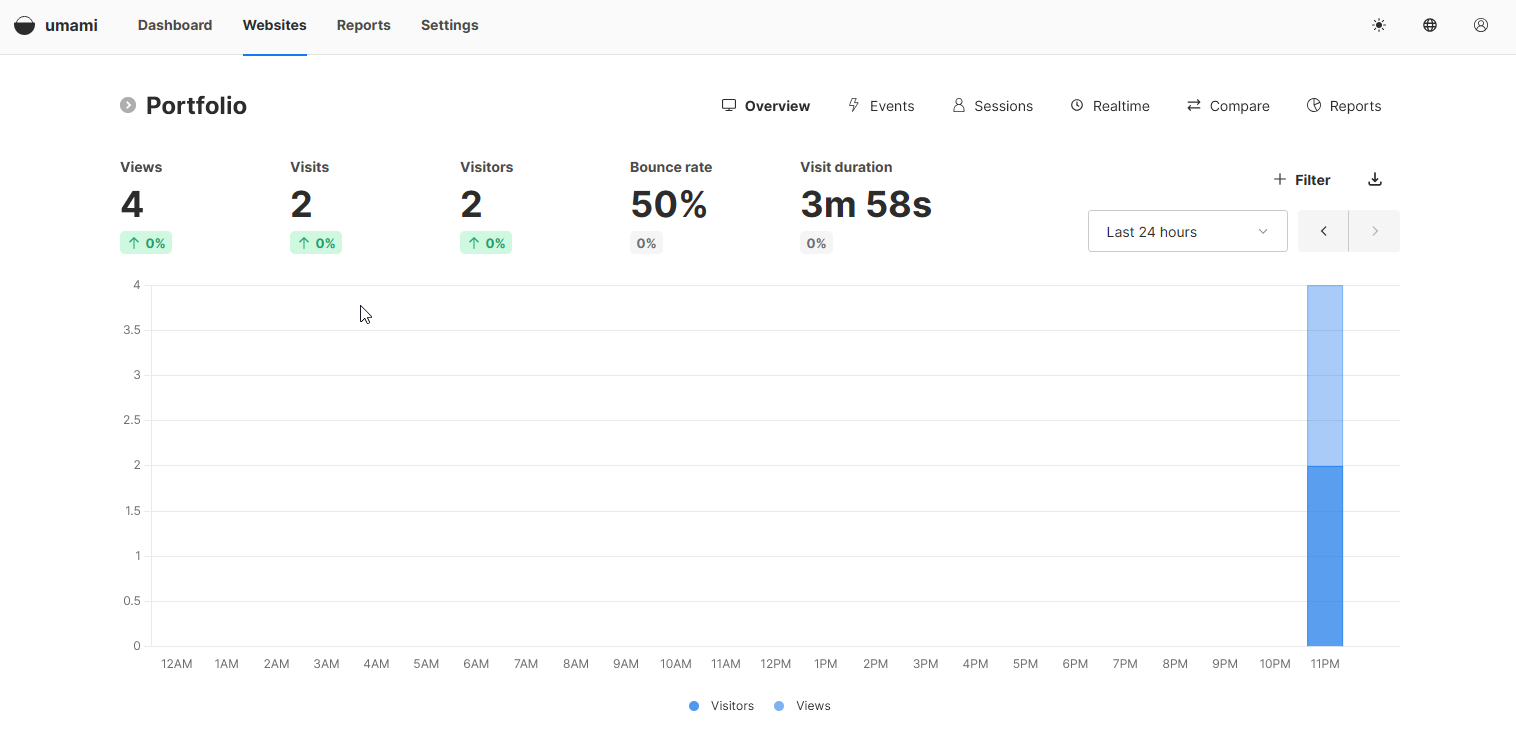
Verifications
And we can see that umami has detected access to the site:
Conclusion
After playing around with it a bit. Umami works very well, but it doesn’t precisely detect what a unique user is.
For example, if I connect on the same PC from the Opera browser and then connect from Firefox, Umami will detect 2 users.
It’s a privacy-focused software, so it doesn’t use the IP, for example, to define a user that could have been used to identify that I am only one user.
Finally, for my personal needs, it’s more than enough. I don’t need to know precisely how many people visit my site, it’s just to have a global overview. I am therefore satisfied to have been able to set up this solution quite easily.
Envisaged improvements:
- Deployment on my homelab Kubernetes.
- Restricting public access via a VPN or a Hetzner private network.
- Fully automating the certificate generation/renewal with a Cron job or a systemd-timer service.
Resources used: