Homelab - 1 - Setup
- Introduction
- 1 - Architecture
- 2 - Principles
- 3 - Technologies Choices
- 4 - Machines setup
- 5 - Step-by-step Setup
- 6 - Install Flux
- Conclusion
Introduction
I’ve spent the last three years working with production‑grade Kubernetes clusters at work. While that experience exposed me to real‑world problems, it left little room for experimentation or deep dives into topics I’m curious about. To fill that gap, I’m launching a personal homelab where I can break things without consequence and explore new technologies on my own terms.
Since January, I took the habit to deploy clusters locally with Minikube or Rancher to quickly set up environments, test ideas, and learn new concepts.
It helps me a lot to have a disposable environment where I can break everything with no consequences. But as I’m gaining experience, I’m working with more complex setups with many different tools across multiple nodes, leading to specific challenges that a single‑node disposable cluster can’t address.
So I built my own laboratory at home, I decided to call it my HomeLab :) (Wait this is already a thing ? I didn’t invent it ?)
This is the first article of a long series I hope !
1 - Architecture
My homelab will be a kubernetes cluster (obviously). I chose K3S as the distributions because I already use it in the past, the installation is pretty straightforward and it is supported by the CNCF.
I preferred bare metal over VMs or cloud instances to gain hands‑on experience managing the full stack.
Also, I want to host applications I will use in my daily life that will force me to handle this setup as an actual production environment with users (yes, just me for now…)
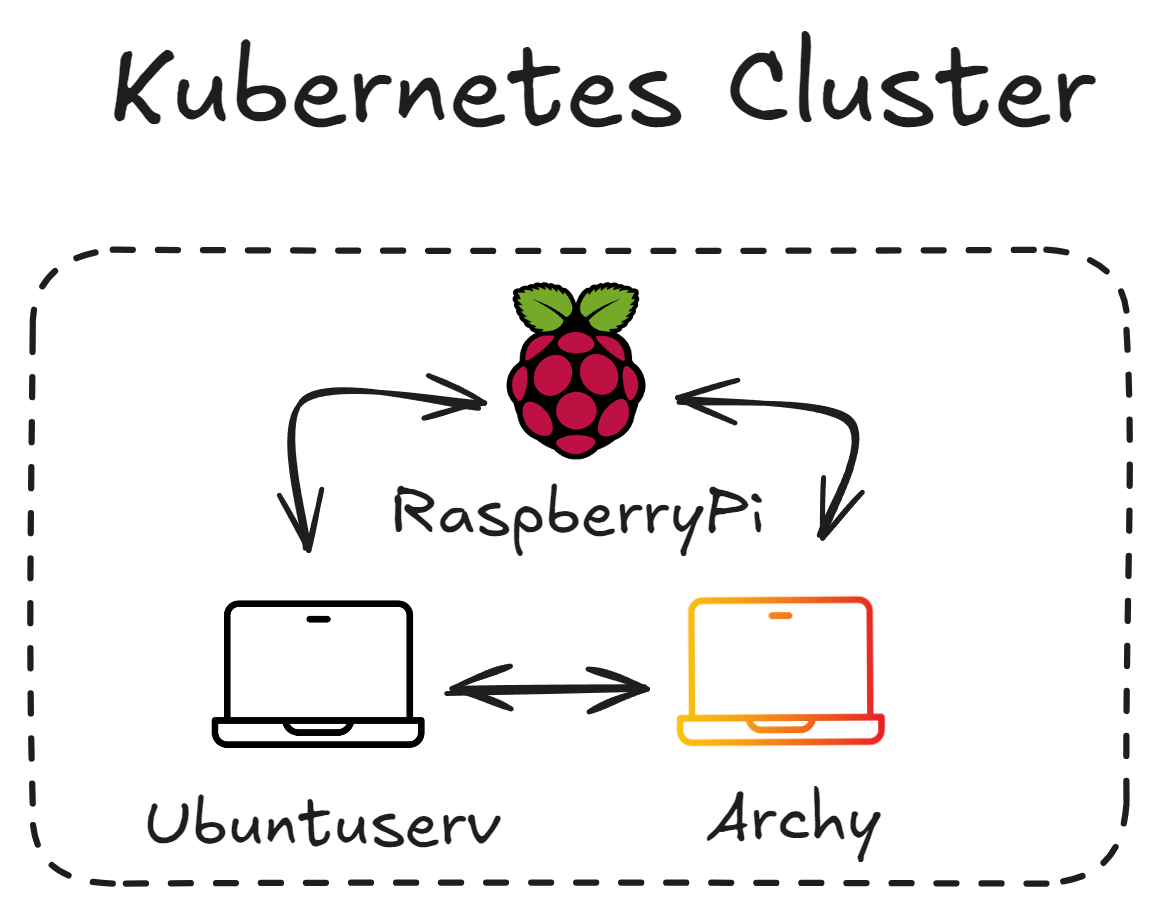
The cluster will be composed of :
- RaspberryPi : A raspberry PI 5 running PI OS - 16 GB RAM, 4 cores processor
- Archy : Old Laptop 1 running arch linux - 8GB RAM, 4 cores processor
- Ubuntuserv : Old Laptop 2 running ubuntu serveur - 4GB RAM, 4 cores processor
Don’t pay attention to the names of the nodes, I don’t know how to name things..
A total of three nodes and all of them will be a master and a worker node.
Best practice in production is to separate the control plane from workloads, but I’m keeping all nodes dual‑purpose to maintain quorum without adding extra hardware.
2 - Principles
I want to follow best practices and integrates latest innovation and way of doing in my homelab.
This is subject to changes but for now I decided to :
- Handle everything via GitOps and automate all deployments
- Follow the least privileged principles and secure my containers
- Do not expose services directly to the internet
- Create alerts and monitoring dashboard to monitor everything
3 - Technologies Choices
Most of my choice are the most used technologies or those we use at work.
Gitops - Flux
At work, I currently use only Argo, so I wanted to explore what Flux has to offer.
Secret Management - Vault
At work, we use Vault for secret management, but I wanted to try using it in ways I haven’t at the office.
Monitoring
The classic stack: Grafana, Loki, and Prometheus. I didn’t really use it until few months ago.
4 - Machines setup
The machines in my homelab are all repurposed devices—I’ll share more details about each below.
RaspberryPi
I got this one from school. I originally used it to follow the Mischa VAN DEN BURG’s GitOps Kubernetes Courses but it had been sitting idle ever since. Now, I’m giving it a second life in my homelab.
Fun fact: When I tried to reboot the Pi months later, I ran into strange storage errors. Turns out, SD cards aren’t ideal for Kubernetes because the control plane is write-heavy.
I bought a new SD card (yes, the same mistake) and rebuilt the OS from scratch using Rufus to flash the card. In the future I will invest in an SSD.
Archy
This was an old laptop gathering dust at my parents’ house. It came with Windows 10 and was barely usable. I first tried Mint Linux, which was better, but still sluggish.
Eventually, I installed Arch Linux as I wanted to dive deeper into how Linux works and see if I could make the machine usable again. I’ll write a full article about this experience someday.
UbuntuServ
This is another old laptop I repurposed. I simply installed Ubuntu Server on it. No dramatic backstory, just another node for my cluster.
5 - Step-by-step Setup
Bootstrap the first node
I already had a K3S cluster running on my raspberry PI using the default embedded database.
https://docs.k3s.io/datastore/ha-embedded
To change that behavior and use etcd for our HA 3 nodes Cluster, i had to update the service at /etc/systemd/system/k3s.service to add cluster-init :
ExecStart=/usr/local/bin/k3s server --cluster-init --disable=helm-controllerRestart k3s :
sudo systemctl daemon-reload
sudo systemctl restart k3s
We can verify the database switch by typing :
kubectl get nodes
Join additional nodes
We now have to install k3s on the two laptop and join the cluster.
We have to launch this command :
curl -sfL https://get.k3s.io | K3S_TOKEN=SECRET sh -s - server \ --server https://raspberry.home:6443 \We can find the token in the raspberryPi at /var/lib/rancher/k3s/server/token and replace it in the command.
After launching the command :

Version alignment
We notice a version mismatch across nodes.
It’s a good practice to have to same version between our nodes.
https://docs.k3s.io/upgrades/manual#upgrade-k3s-using-the-installation-script
To upgrade our raspberryPi version we just have to relaunch the installation script :
curl -sfL https://get.k3s.io | K3S_TOKEN=SECRET sh -s - server --cluster-initFinally
We do the same thing for the two nodes.

6 - Install Flux
We are going to install FluxCd in our K3S Cluster.
Create a GitHub PAT
We need to create a GitHub Personal Access Token with repository permissions.
We can use a classic tokens but to be more compliant and secure it’s better to use a fine grained PAT only for our repo.
We need the following permissions :
Administration: Read and writeContents: Read and writeMetadata: Read-only
We need to export these variables :
export GITHUB_TOKEN=<your-token>
export GITHUB_USER=<your-username>
I created a script to load env variables for a specific project. You can find it here. This is useful because if we just export it. We would lose the variables when closing the shell. I don’t know if I will need it earlier. For sure I don’t commit it to git.
We install the flux cli tool :
brew install fluxcd/tap/fluxInstall flux onto the cluster
flux bootstrap github \
  --owner=$GITHUB_USER \
  --repository=pi-cluster \
  --branch=main \
  --path=./clusters/staging \
  --personal
This command allow to configure in which repository and branch we wants flux to monitor. Then Flux will create the manifest file in the repo to manage itself.
We can manage several clusters with the same GitOps repostiory (production, staging..)
Results
- Flux creates necessary manifests in the GitHub repository
- New namespace ‘flux-system’ is created on the cluster with Flux components
- GitOps controller is now active on the cluster
From now the GitOps Controller is installed in our cluster. And We can start deploying things.
Conclusion
I can finally call myself a true engineer because I have a home lab where I can experiment freely !
Years ago I watched many YouTube creators building homelabs. I envied them, and I promised myself I’d do the same someday.
I have a goal now that is to have an entire room dedicated for my homelab, a real datacenter !