
Enhancing my Cloud Skills - Week 7 - Terraform
1 - Terraform Fundamentals
2 - Terraform vs CloudFormation
3 - Terraform Simple Example
4 - Terraform Commands
5 - Terraform Configuration Files
6 - Terraform Architecture
7 - Project - 5 - Deploy a VPC Using Terraform
8 - Project - 6 - Deploy a Next-Js Application using Terraform
1 - Terraform Fundamentals
Terraform, developed by HashiCorp, is one of the most widely used Infrastructure as Code (IaC) tools. It enables users to build, change, and version-control infrastructure across multiple cloud providers, on-premises environments, and even hybrid setups. Terraform simplifies infrastructure management by allowing developers and operations teams to define their infrastructure in code, using a declarative approach.
At its core, Terraform utilizes HCL (HashiCorp Configuration Language) to describe the desired state of infrastructure. This makes it easier to manage infrastructure consistently and predictably.
Key Features
Declarative Approach
Terraform adopts a declarative configuration model, meaning that users define what the infrastructure should look like, and Terraform automatically figures out how to implement those changes. This reduces the complexity of infrastructure management by abstracting the underlying processes needed to achieve the desired state.
- Example: You specify that you need an EC2 instance in AWS, and Terraform handles the provisioning, configuration, and connection to other resources.
Cloud Agnostic
Terraform is cloud-agnostic, meaning it can work with a wide range of cloud providers, including AWS, Azure, Google Cloud Platform (GCP), IBM Cloud, and many more. It can also be used for on-premises infrastructure (e.g., VMware) or hybrid environments. This allows teams to manage resources across multiple clouds using a single, consistent toolset.
State Management
Terraform keeps track of the current state of the infrastructure through state files. These files store information about the resources Terraform manages, allowing it to understand what has already been provisioned and what changes need to be made when updates occur.
- Example: If a new resource is added to the configuration, Terraform compares the state file with the actual infrastructure and only creates the new resource without disturbing existing ones.
Modular Architecture
Terraform encourages the use of reusable modules, which are predefined sets of configurations that can be reused across multiple projects. This helps in maintaining consistency, reducing duplication of code, and improving the management of complex infrastructure. Modules make it easier to share best practices and manage infrastructure at scale.
Providers and Plugins
Providers
Providers are the core components that allow Terraform to manage infrastructure resources across different platforms. Providers act as the bridge between Terraform and external platforms like AWS, Azure, and GCP. Each provider offers a set of resources and data sources that Terraform can interact with. They are responsible for making API calls to interact with cloud services and expose those services as manageable resources within Terraform configurations.
How do Providers Work ?
When configuring a provider in Terraform, the necessary provider plugins are automatically downloaded and installed during the terraform init phase. Terraform ensures the correct version of the provider is used, ensuring compatibility with the Terraform core.
Terraform’s provider registry contains both official and community-contributed providers, making it easy to discover and use a wide range of providers.
Configure a provider :
provider "aws" {
	region = "us-west-2"
	access_key = "my-access-key"
	secret_key = "my-secret-key"
}
Defining resources :
resource "aws_instance" "example" {
	ami = "ami-0fjezofijzf"
	instance_type = "t2.micro"
}
Multiple Providers in a Single Configuration
Terraform allows you to configure multiple providers in a single configuration file. This is especially useful when you need to manage resources across different regions or cloud platforms.
provider "aws" {
	alias = "west"
	region = "us-west-1"
}

provider "aws" {
	alias = "east"
	region = "us-east-1"
}

resource "aws_instance" "example_west" {
	provider = aws.west
}

resource "aws_instance" "example_east" {
	provider = aws.east
}
Key Concepts
Provider Configuration
The provider configuration allows you to set the credentials and settings needed for Terraform to interact with the specific platform. It includes :
- authentication details (e.g., access keys, secret keys),
- region settings
- provider-specific options.
provider "aws" {
  region     = "eu-west-3"
  access_key = "my-access-key"
  secret_key = "my-secret-key"
}
Resource Management
Each provider defines and manages resource types that you can specify in Terraform configurations. Resources represent specific infrastructure components like EC2 instances, S3 buckets, databases, etc.
resource "aws_instance" "example" {
  ami           = "ami-0fjezofijzf"
  instance_type = "t2.micro"
}
Data Sources
Data Sources in Terraform allow you to fetch and use information from external sources or other configurations. These can be used to reference information that Terraform doesn’t manage directly but needs for configuration.
data "aws_vpc" "default" {
  default = true
}
2 - Terraform vs CloudFormation
AWS CloudFormation is a native AWS Infrastructure as Code (IaC) service that provides a declarative way to define, provision, and manage resources within the AWS ecosystem. It uses stacks, which are collections of resources defined in configuration templates written in YAML or JSON. CloudFormation is AWS-specific, making it deeply integrated with AWS services but limited in portability outside of AWS.
Terraform, on the other hand, is a cloud-agnostic IaC tool developed by HashiCorp. It allows you to provision and manage infrastructure across multiple cloud providers and environments, such as AWS, Azure, GCP, and on-premises systems, by using a declarative approach and HCL (HashiCorp Configuration Language).
| Tool | Portability | Resources Management | Advantages | Disadvantages |
|---|---|---|---|---|
| CloudFormation | AWS Native | Stacks | Managed | AWS Lock in, Lot of code to write |
| Terraform | Cloud Agnostic | State files | Cloud Agnostic & Big community | Learning Curve, Complex State Management, Licenses and no longer Open-source. |
| In CloudFormation we talk about properties and in Terraform we talk about resource parameters. |
3 - Terraform Simple Example
1. Setup Terraform for AWS :
main.ts
provider "aws" {
  region = "eu-west-3"
}
2. Init the Terraform configuration
terraform init3. Plan to view the changes to the infrastructure
terraform plan4. Apply the changes to the infrastructure
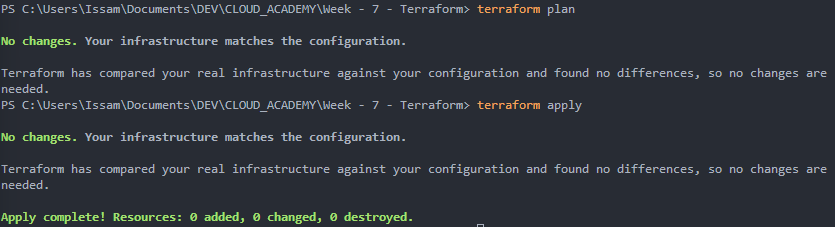
terraform applyIn my opinion, we get nicer outputs from Terraform than CloudFormation :
4 - Terraform Commands
Basic Commands
Init
Initializes a new or existing Terraform Configuration :
# Downloads the necessary provider plugins and set up the backend for storing state files
terraform init
Plan
Compare Current state and desired state in config files and determines actions needed to be taken to achieve desired state by creating an execution plan :
# Shows changes that Terraform will make to infrastructure before applying
terraform plan
Apply
Apply changes to the infrastructure and executes actions proposed in the plan :
# Create, modify or delete resources as needed
terraform apply
Show
Displays the current state of the infrastructure resources in a Human-readable Format :
terraform showOutput
Retrieve Output Values defined in Terraform Configuration (IP Addresses, metadata…) :
terraform outputDestroy
Remove all resources managed by the Terraform Configuration :
terraform destroyFmt
Formats the Terraform Configuration Files according to the Canonical Style Conventions :
terraform fmtValidate
Checks the syntax of the Terraform configuration files & ensures that they are properly formatted :
terraform validateTypical Workflow
In general we do :
1 - Plan
terraform plan2 - Apply
terraform apply3 - Observe
terraform show
terraform output
5 - Terraform Configuration Files
We use .tf files to write our configuration using HCL. 5 things can be found in configuration templates :
- provider
- resource
- variable
- datasource
- output
# Providers - Define which cloud providers or services Terraform will interact with
provider "aws" {
  region = "us-west-2"
}

# Resources - Define the infrastructure compoents that will be created
resource "aws_instance" "example" {
  ami           = "ami-0c55b159cbfafe1f0"
  instance_type = var.instance_type # "t2.micro"
  tags = { # metadata
    Name = "ec2-instance"
  }
}

# Variables - Helps make the configuration more flexible and reusable
variable "instance_type" {
  description = "The type of instance to create"
  default     = "t2.micro"
}

# Outputs - Return data from the configuration to the user
output "instance_id" {
  description = "The ID of the EC2 instance"
  value       = aws_instance.example.id
}

# Data Sources - Define data sources that will be used to retrieve information that is not defined in the configuration
data "aws_ami" "example" {
  most_recent = true
  owners = ["self"]
  tags = {
    Name   = "app-server"
    Tested = "true"
  }
}
6 - Terraform Architecture
Terraform is structured around a simple, yet powerful workflow that leverages providers to interact with APIs of different platforms (such as AWS, Azure, or Google Cloud). Terraform is designed to manage infrastructure in a consistent, scalable, and declarative manner. This architecture provides flexibility for managing complex environments while simplifying resource management through reusable configurations and modules.
Terraform Workflow
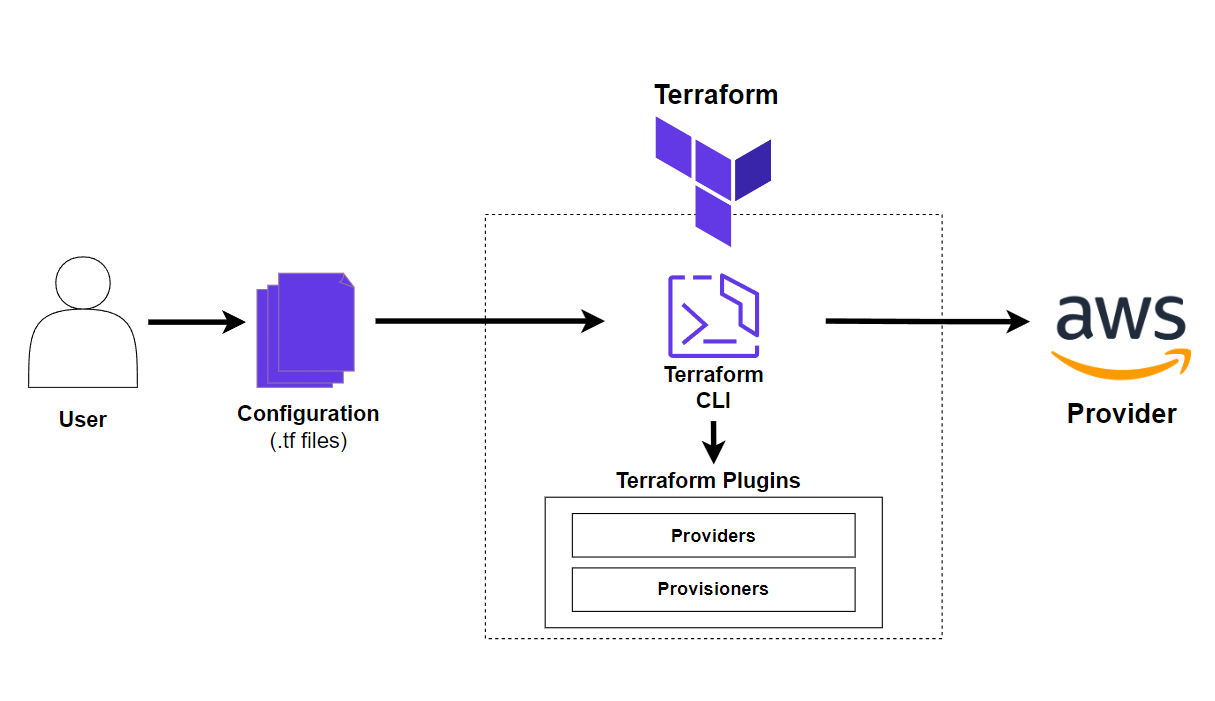
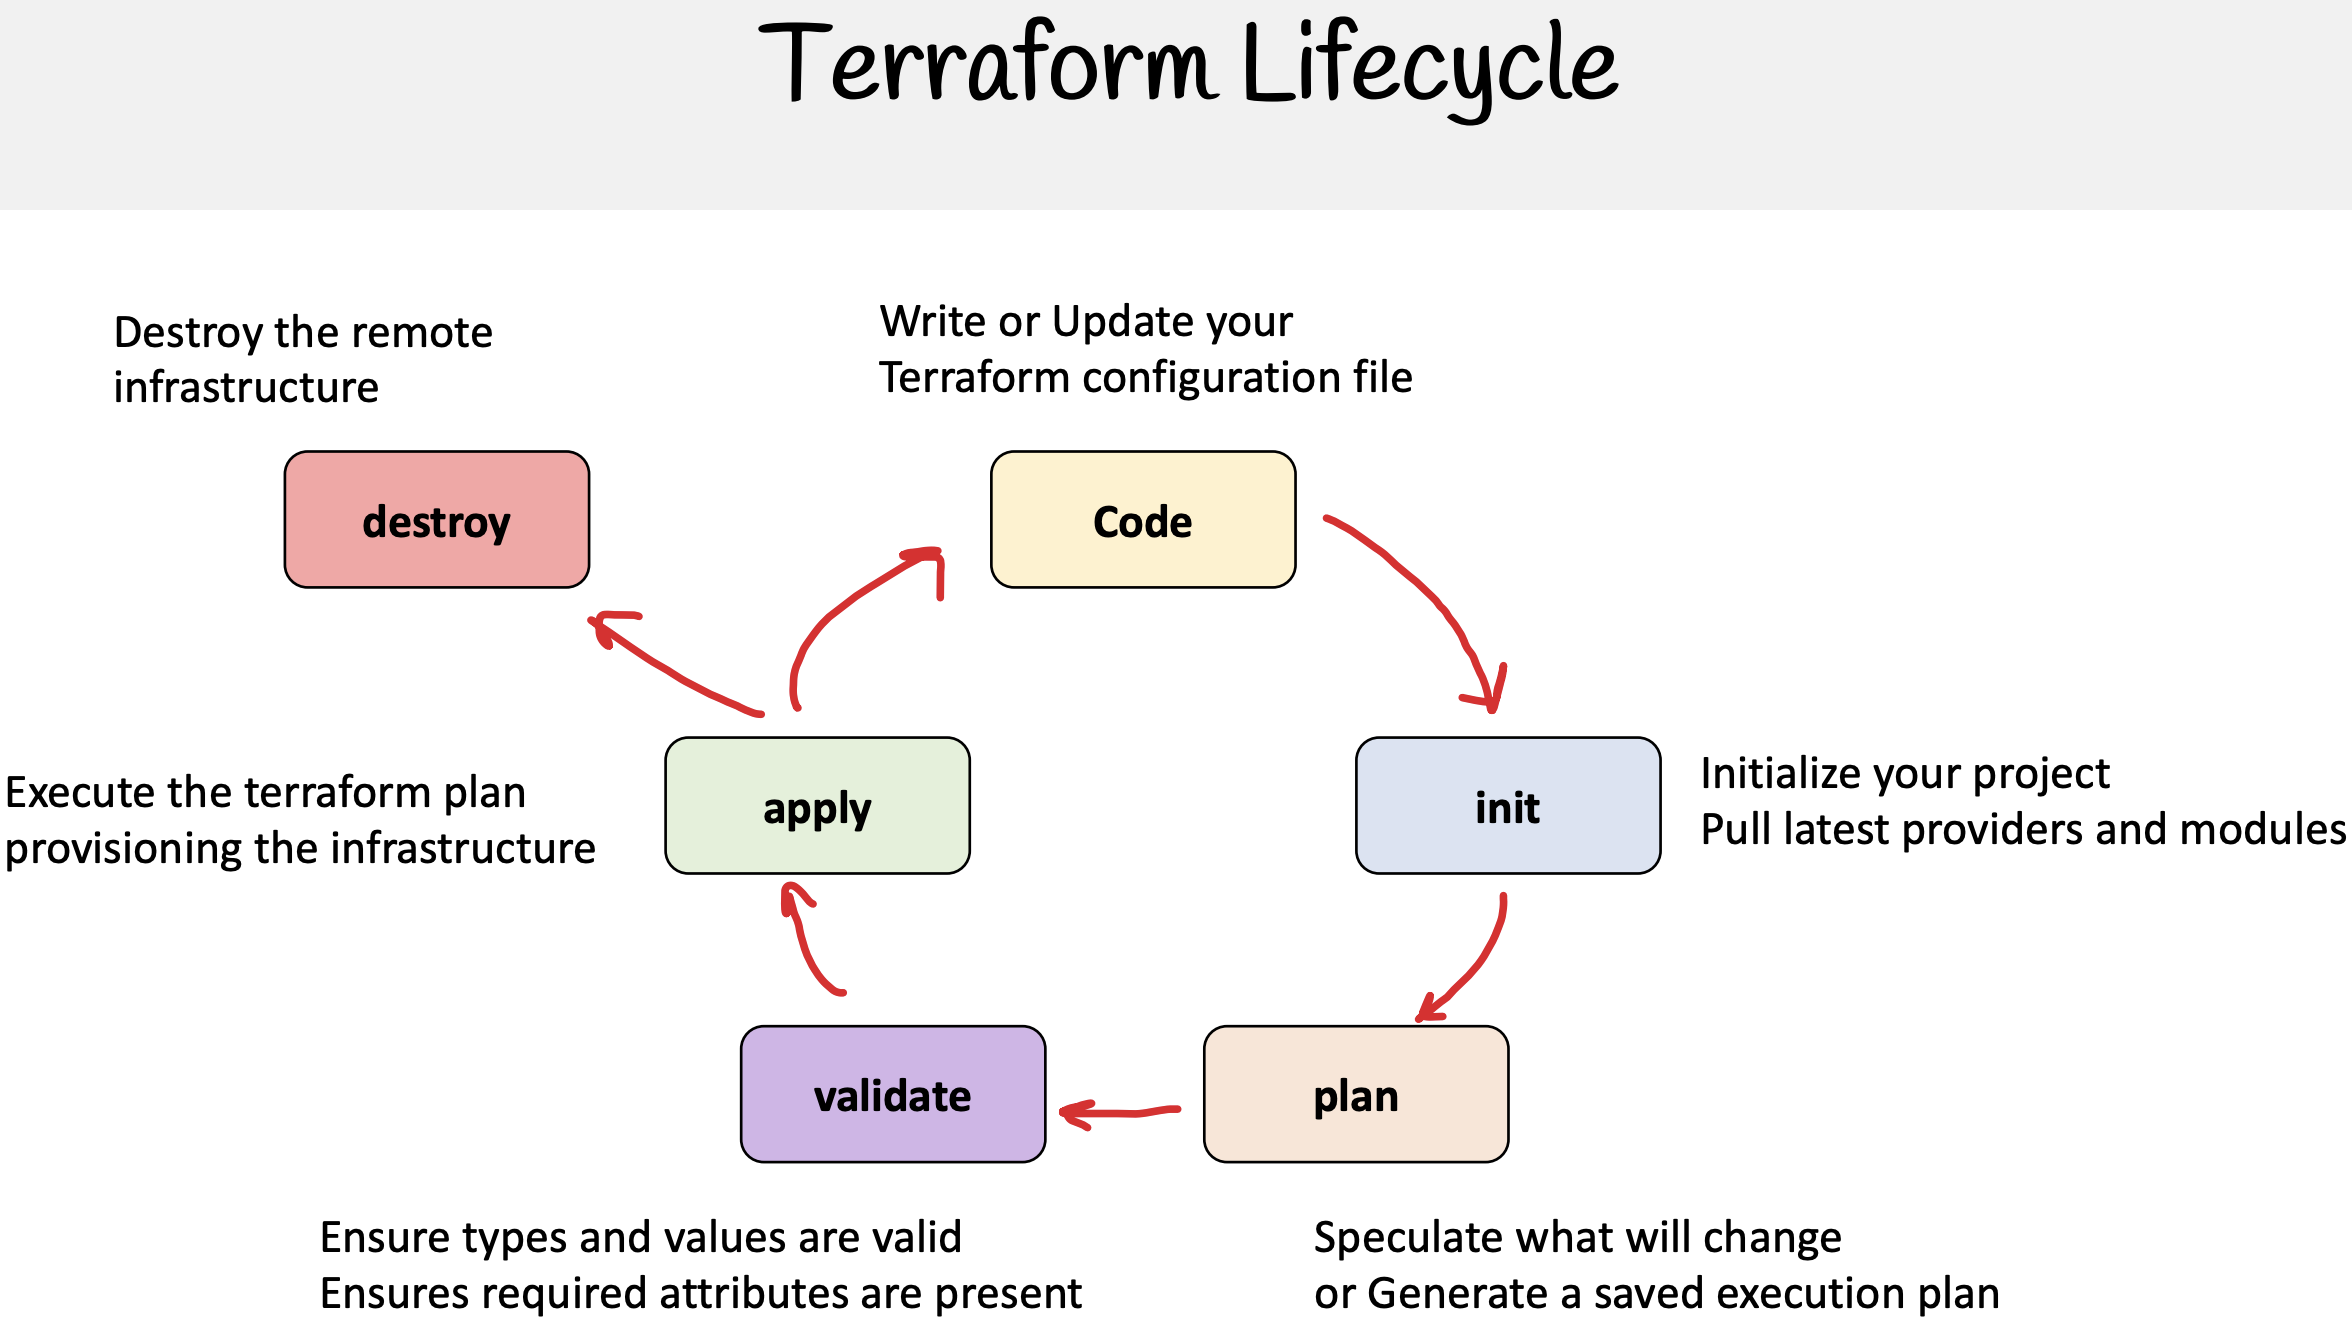
The Terraform workflow follows a clear set of steps that allow for a seamless process from defining the infrastructure to deploying and validating it:
1. Define
- We write configuration files using HCL (HashiCorp Configuration Language) that describe the desired infrastructure. These files specify what resources we need, how they should be configured, and any dependencies between them.
2. Init
- We initialize the Terraform project in the working directory using the
terraform initcommand. This step downloads the necessary provider plugins and sets up the backend configuration, including the state files.
3. Plan
- Terraform generates an execution plan using the
terraform plancommand, which shows the changes Terraform will make to the infrastructure. This is a crucial step for reviewing potential changes before applying them.
4. Apply
- Using the
terraform applycommand, we apply the configuration changes to the infrastructure based on the plan created earlier. Terraform will make the necessary API calls through the defined providers to create, update, or delete resources as needed.
5. Validate
- After deployment, the infrastructure is validated to ensure that the resources have been properly configured and meet the expected criteria. Validation can be done manually or through automated tools.
Terraform Project Structure
Terraform encourages the use of best practices and structured project organization to simplify infrastructure management and enhance collaboration.
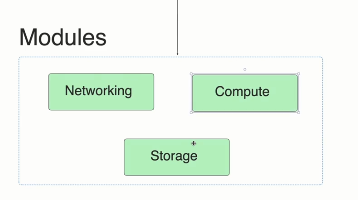
Modules
Modules in Terraform allow for reusability and shareability of configurations. They adhere to the DRY (Don’t Repeat Yourself) principle, allowing teams to avoid duplicating code across multiple projects.
They are reusable and shareable. DRY principles.
Project File Structure
A typical Terraform project follows a structured approach to file organization. We want to use naming conventions to make it easier to understand our project. We separate environnements and we always use main.ts, outputs.tf and wariables.tf for consistency. It is best practice to separate different parts of the configuration into specific files such as :
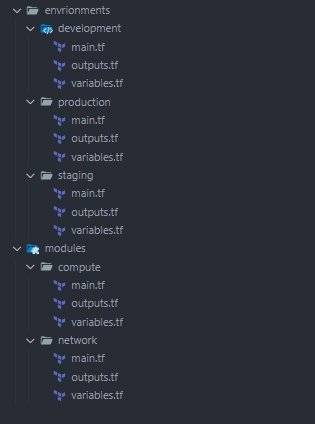
- main.tf: Defines the main infrastructure resources.
- variables.tf: Contains input variables to parameterize configurations.
- outputs.tf: Defines the output values that Terraform will display after applying the configuration (e.g., instance IDs, public IPs).
- provider.tf: Defines the provider(s) and any necessary configurations, like credentials and regions.
You can further organize the project by creating specific files for different resources, such as ec2.tf for EC2 instances or vpc.tf for VPC configurations, to improve readability and maintainability.
State Files (terraform.tfstate)
By default, Terraform stores the state of your infrastructure locally. The state file (terraform.tfstate) tracks the mapping between the real-world infrastructure and the configurations. This allows Terraform to know what resources exist, their dependencies, and how to update them.
- Why State Files Are Important:
- Infrastructure Tracking: The state file holds the current state of the deployed infrastructure, so Terraform knows what changes to make.
- Dependency Management: Terraform relies on the state file to manage dependencies between resources (e.g., an EC2 instance depends on a VPC).
Remote State Files
terraform.tfstate
By default, state files are stored locally by Terraform. In large teams or environments, it is best practice to use remote state storage (Terraform Cloud, S3…) to allow collaboration and ensure that multiple users can access and update the infrastructure safely. Remote backends also offer state locking, preventing multiple users from modifying the state simultaneously and causing conflicts.
We can us S3 and mongodb for example because it is json data object.
Creating a Remote State with S3
An example of configuring a remote state in Amazon S3, we can name this file as we want, but it is a good practice to name it state.tf as it is declarative and self-explanatory :
# run terraform init to setup the state
terraform {
  backend "s3" {                                   # backend block to define the s3 backend
    bucket         = "terraform-state-bucket-is"   # The S3 bucket to store the state file
    key            = "global/s3/terraform.tfstate" # The path within the bucket where the state file is stored
    region         = "eu-west-3"                   # The AWS region of the S3 bucket
    dynamodb_table = "s3-tf-table"                 # DynamoDB table for state locking
  }
}
Benefits of using a remote backend :
- Collaboration: Multiple team members can work on the same Terraform project without conflicts, as the state is centrally stored.
- Security: The state file can contain sensitive information (like resource IDs and metadata), so using IAM policies for secure access to the remote state ensures confidentiality.
- State Locking: Using DynamoDB to lock the state file prevents race conditions or concurrent modifications to the infrastructure.
- Disaster Recovery: Storing the state remotely ensures that the state can be restored in the event of local failures or disasters.
Important Considerations for Remote State
-
Manually Create the State Infrastructure:
- It is important to manually create the S3 bucket and DynamoDB table before using them as backends. If Terraform itself managed the state infrastructure, it could create a chicken-and-egg problem, where Terraform needs state to manage the resources that provide the state storage.
-
Running Terraform Init:
- After configuring the remote backend, you need to run
terraform initto reinitialize the backend. This command will set up the S3 bucket and DynamoDB table as the remote state location.
- After configuring the remote backend, you need to run
-
State File Sensitivity:
- Because the state file can contain sensitive information about your infrastructure (such as IP addresses, user data, or credentials), it’s essential to secure access to the state using IAM roles and encryption options in S3.
7 - Project | Deploy our VPC from before
We already deploy a VPC architecture using clickOps & CloudFormation. You can find the link here Now we want to deploy it again using Terraform.
1. Define the remote state
We have to create an S3 bucket and a DynamoDB table. Then create a state.tf file :
terraform {                                        # top level block to define terraform behaviour in our backend configuration
  backend "s3" {                                   # backend block to define the s3 backend
    bucket         = "terraform-state-bucket-is"   # bucket name to store the state file
    key            = "global/s3/terraform.tfstate" # path where to store the state file within the bucket
    region         = "eu-west-3"
    dynamodb_table = "terraform-locks" # dynamodb table name to lock the state file, to prevent concurrent modifications
  }
}
We want to execute terraform init to setup our remote state. Before we need to create our s3 bucket and our DynamoDB Table.
terraform initTo verify I tried :
terraform planI run through this error :
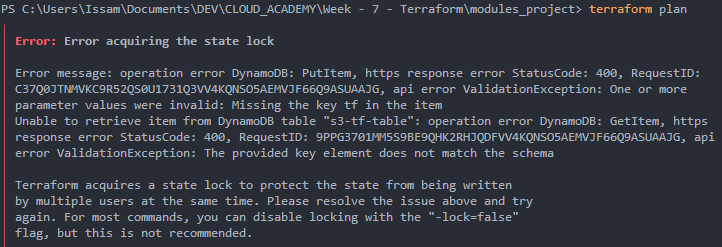
It was because I name the partition key as tf but we need to name it LockID. I had to recreate a new table and change the state.tf file with the name of the new table.
Now it’s working :
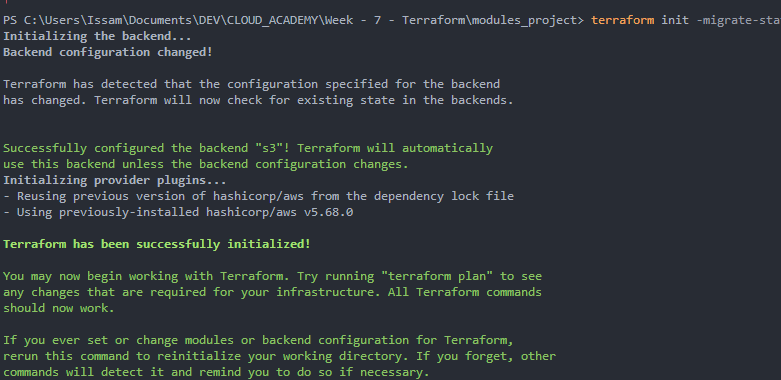
2. Writing the configuration
I created the configuration in main.tf :
provider "aws" {
  region = "eu-west-3"
}

# VPC
resource "aws_vpc" "main" {
  cidr_block = "192.168.0.0/16"

  tags = {
    Name = "main-tf-vpc"
  }
}

# Subnet 1
resource "aws_subnet" "subnet1" {
  vpc_id            = aws_vpc.main.id
  cidr_block        = "192.168.1.0/24"
  availability_zone = "eu-west-3a"
  tags = {
    Name = "main-tf-vpc-subnet1"
  }
}

# Subnet 1
resource "aws_subnet" "subnet2" {
  vpc_id            = aws_vpc.main.id
  cidr_block        = "192.168.2.0/24"
  availability_zone = "eu-west-3b"
  tags = {
    Name = "main-tf-vpc-subnet2"
  }
}


# Internet Gateway
resource "aws_internet_gateway" "igw" {
  vpc_id = aws_vpc.main.id

  tags = {
    Name = "main-tf-vpc-igw"
  }
}

# Route Table
resource "aws_route_table" "rt" {
  vpc_id = aws_vpc.main.id

  route {
    cidr_block = "0.0.0.0/0"
    gateway_id = aws_internet_gateway.igw.id

  }
  tags = {
    Name = "main-tf-vpc-rt"
  }
}

# Route Table Association Subnet 1
resource "aws_route_table_association" "rta1" {
  subnet_id      = aws_subnet.subnet1.id
  route_table_id = aws_route_table.rt.id
}

# Route Table Association Subnet 2
resource "aws_route_table_association" "rta2" {
  subnet_id      = aws_subnet.subnet2.id
  route_table_id = aws_route_table.rt.id
}
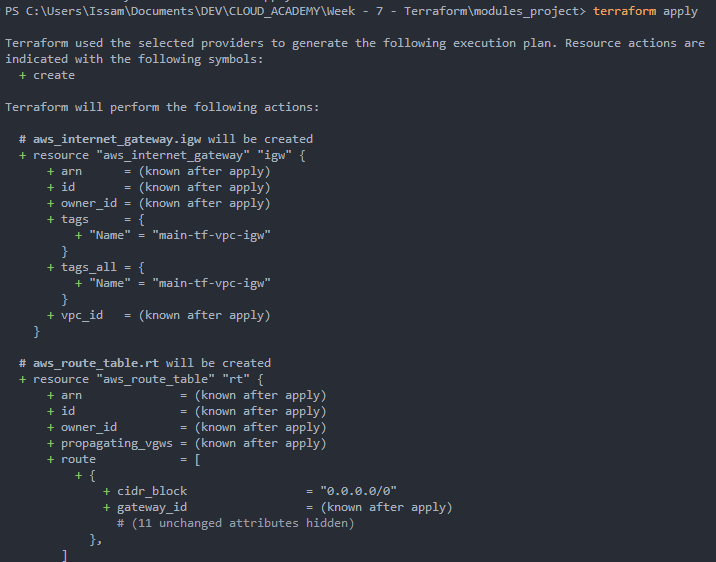
3. Plan
We run :
terraform planWe can review everything that will be deployed :
4. Apply
We can then validate to let terraform create the resources :
terraform apply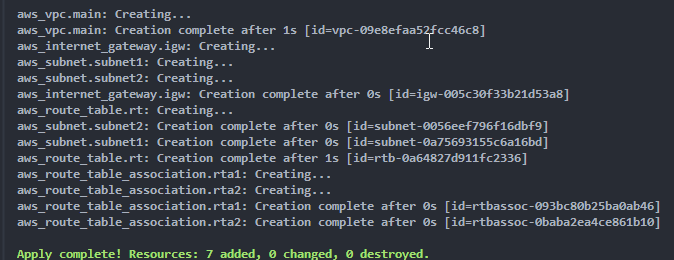 We can go to the AWS Portal to verify everything was created.
5. Clean
Finally we can delete the resources :
terraform destroy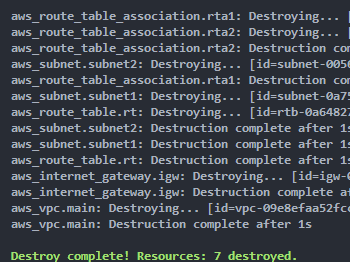
Finally, We could conclude that terraform has a less verbose syntax making it zasier than CLoudFormation. Moreover we have lot more informations in the CLI and we could directly see if everything is ok that is a lot better and more visual.
8 - Project | Deploy a Next-Js Application
[[AWS - Bucket Policies]]
1. Requirements
Scenario Overview
Client: James Smith, a freelance web designer
Project: Portfolio Website Deployment
Project Description: James Smith, a freelance web designer, wants to showcase his work and attract potential clients through an online portfolio. He has designed a modern, responsive single-page website using the Next.js framework. James requires this website to be hosted on a robust, scalable, and cost-effective platform. Additionally, the website needs to be highly available and deliver fast loading times for a global audience.
My Role: As a team of cloud engineers, The task is to deploy James’s Next.js portfolio website on AWS using Infrastructure as Code (IaC) principles with Terraform. This project will give me hands-on experience with Terraform, S3, and CloudFront, mimicking a real-world deployment scenario.
Problem Statement
James needs his portfolio website to be:
- Highly Available: The website should be accessible to users worldwide with minimal downtime.
- Scalable: As his portfolio gains traction, the hosting solution should handle increased traffic without performance degradation.
- Cost-Effective: Hosting costs should be optimized, avoiding unnecessary expenses.
- Fast Loading: The website should load quickly for visitors, providing a seamless user experience.
Given these requirements, deploying the website using AWS services such as S3 for static hosting and CloudFront for content delivery is an ideal solution. Using Terraform will allow you to automate and manage the infrastructure efficiently.
Project Outcome
By the end of this project, we should have:
- Deployed a Next.js Website: Successfully deployed the Next.js portfolio site on AWS.
- Implemented Infrastructure as Code: Used Terraform to automate the creation of AWS resources.
- Configured Global Content Delivery: Set up AWS CloudFront to deliver the website content globally with low latency.
- Ensured Security and Performance: Applied best practices for security and performance, ensuring a fast and secure website for James’s portfolio.
- Deploy everything to github: Create a github repo and host all your project files and code there.
Here is the Architecture design:
**
We would only use the template example from nextJS to simplify but we could use any static website.
2. S3 & Cloudfront
Using Amazon CloudFront with Amazon S3 allows you to set up a Content Delivery Network (CDN) that improves the performance, security, and scalability of your website or application. By delivering content from servers located closer to the user, CloudFront can significantly reduce latency and improve the speed at which data is delivered. I never used a CDN before, I read the documentation about how it works wit S3. It’s pretty simple.
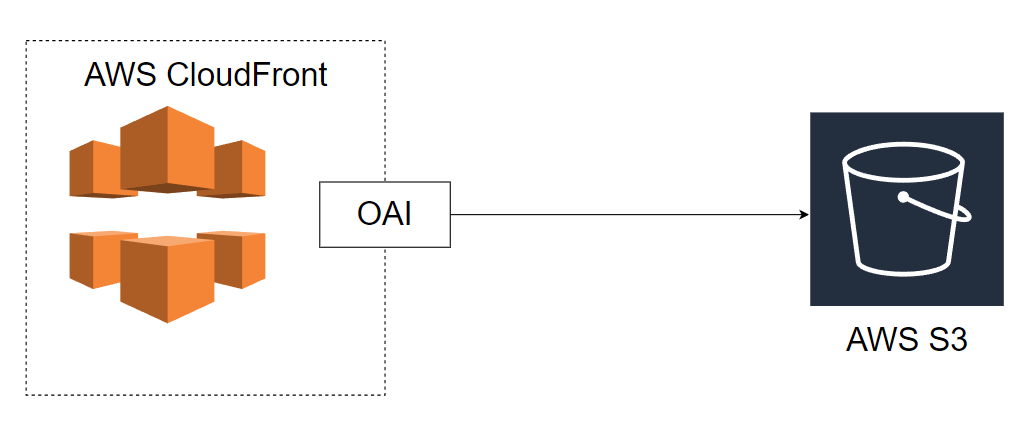
The diagram above outlines the relationship between the S3 bucket, CloudFront, and OAI. Here’s how the components fit together:
-
CloudFront Distribution:
- Acts as the public-facing endpoint that users interact with.
- The distribution is configured to use your S3 bucket as the origin for serving static content (like
index.htmlor other files).
-
S3 Bucket:
- The bucket stores the content (e.g., static web pages, images, videos).
- It should be private to ensure that no one can directly access the bucket from the internet.
-
Origin Access Identity (OAI):
- The OAI is associated with the CloudFront distribution and is the identity used to access the private S3 bucket.
- This ensures that only CloudFront can access your S3 bucket, providing secure access control.
-
Bucket Policy:
- You need to configure an S3 bucket policy to explicitly allow CloudFront (via the OAI) to access the content in your S3 bucket.
- This restricts public access to the bucket and allows only requests coming from the CloudFront distribution.
We have our cloudfront distribution configure with our S3 bucket as origin. We only want people to access our index.html file in our bucket only from CloudFront. So we use an OAI. The OAI allow S3 to indentify our cloudfront distribution. We need to create a bucket policies to allow access to the bucket. What we did earlier wasn’t really best practice because our bucket is accessible from anywhere by anybody.
3. Deployement
You can find all the project here.
For this project, I first allow public access by anyone from anywhere.
provider "aws" {
  region = "eu-west-3"
}

# Create a new S3 bucket
resource "aws_s3_bucket" "portfolio_is_bucket" {
  bucket = "portfolio-nextjs-is"

  tags = {
    Name = "portfolio-nextjs-is"
  }
}

# Enable bucket ownership controls to enforce bucket owner permissions
resource "aws_s3_bucket_ownership_controls" "portfolio_is_ownership_controls" {
  depends_on = [
    aws_s3_bucket.portfolio_is_bucket
  ]

  bucket = aws_s3_bucket.portfolio_is_bucket.id

  rule {
    object_ownership = "BucketOwnerPreferred"
  }
}

# Disable public access block to allow public access to the bucket
resource "aws_s3_bucket_public_access_block" "portfolio_is_public_access_block" {
  depends_on = [
    aws_s3_bucket.portfolio_is_bucket
  ]

  bucket = aws_s3_bucket.portfolio_is_bucket.id

  # Set everything to false to allow public access to the bucket
  block_public_acls       = false # Block public ACLs
  block_public_policy     = false # Block public bucket policies
  ignore_public_acls      = false # Ignore public ACLs
  restrict_public_buckets = false # Block public and cross-account access to buckets
}

resource "aws_s3_bucket_policy" "portfolio-bucket_policy" {
   depends_on = [
     aws_s3_bucket.portfolio-bucket,
     aws_s3_bucket_public_access_block.my_bucket_public_access_block
   ]
   bucket = aws_s3_bucket.portfolio-bucket.id
   policy = jsonencode({
     Version = "2012-10-17",
     Statement = [
       {
         Sid       = "PublicReadGetObject",
         Effect    = "Allow",
         Principal = "*",
         Action    = "s3:GetObject",
         Resource  = "${aws_s3_bucket.portfolio-bucket.arn}/*",
       },
     ],
   })

# Enable the bucket to host a static website
resource "aws_s3_bucket_website_configuration" "portfolio_is_website" {
  depends_on = [
    aws_s3_bucket.portfolio_is_bucket
  ]

  bucket = aws_s3_bucket.portfolio_is_bucket.id

  index_document {
    suffix = "index.html"
  }
  error_document {
    key = "index.html"
  }
}


# Create an origin access identity to allow CloudFront to reach the bucket
resource "aws_cloudfront_origin_access_identity" "portfolio_is_origin_access_identity" {
  comment = "Allow CloudFront to reach the bucket"
}

# Create a CloudFront distribution to serve the static website
resource "aws_cloudfront_distribution" "portfolio_is_cloudfront" {

  # Describes the origin of the files that you want CloudFront to distribute
  origin {
    domain_name = aws_s3_bucket.portfolio_is_bucket.bucket_regional_domain_name
    origin_id   = aws_s3_bucket.portfolio_is_bucket.id # unique identifier for the origin

    s3_origin_config {
      origin_access_identity = aws_cloudfront_origin_access_identity.portfolio_is_origin_access_identity.cloudfront_access_identity_path
    }
  }

  enabled             = true         # enable cloud front distribution directly after creation
  is_ipv6_enabled     = true         # enable IPv6 support
  default_root_object = "index.html" # default root object to serve when a request is made to the root domain


  default_cache_behavior {
    allowed_methods  = ["GET", "HEAD", "OPTIONS"] # HTTP methods that CloudFront processes and forwards to the origin
    cached_methods   = ["GET", "HEAD"]            # HTTP methods for which CloudFront caches responses
    target_origin_id = aws_s3_bucket.portfolio_is_bucket.id

    # Forward the query string to the origin that is associated with this cache behavior
    forwarded_values {
      query_string = false
      cookies {
        forward = "none"
      }
    }
    viewer_protocol_policy = "redirect-to-https" # HTTP and HTTPS requests are automatically redirected to HTTPS
    min_ttl                = 0                   # minimum amount of time that you want objects to stay in a CloudFront cache
    default_ttl            = 3600                # default amount of time (in seconds) that you want objects to stay in CloudFront caches
    max_ttl                = 86400               # maximum amount of time (in seconds) that you want objects to stay in CloudFront caches
  }

  # Allow cloudfront to use default certificate for ssl
  viewer_certificate {
    cloudfront_default_certificate = true
  }

  # Define restrictions on the geographic distribution of your content
  restrictions {
    geo_restriction {
      restriction_type = "none"
    }
  }

  tags = {
    Name = "portfolio-cloudfront-nextjs-is"
  }

}
Then I restrict the access. To access the bucket files we need to pass by our CloudFront CDN.
provider "aws" {
region = "eu-west-3"
}
# Create a new S3 bucket
resource "aws_s3_bucket" "portfolio_is_bucket" {
bucket = "portfolio-nextjs-is"
tags = {
Name = "portfolio-nextjs-is"
}
}
# Enable bucket ownership controls to enforce bucket owner permissions
resource "aws_s3_bucket_ownership_controls" "portfolio_is_ownership_controls" {
depends_on = [
aws_s3_bucket.portfolio_is_bucket
]
bucket = aws_s3_bucket.portfolio_is_bucket.id
rule {
object_ownership = "BucketOwnerPreferred"
}
}
# Disable public access block to allow public access to the bucket
resource "aws_s3_bucket_public_access_block" "portfolio_is_public_access_block" {
depends_on = [
aws_s3_bucket.portfolio_is_bucket
]
bucket = aws_s3_bucket.portfolio_is_bucket.id
# Set everything to false to allow public access to the bucket
block_public_acls = true # Block public ACLs
block_public_policy = true # Block public bucket policies
ignore_public_acls = true # Ignore public ACLs
restrict_public_buckets = true # Block public and cross-account access to buckets
}
################################
# ACLs are used to have more fine-grained control over objects in the bucket | Not needed for now
# # Set the bucket Access Control List to public-read allowing public read access to the bucket
# resource "aws_s3_bucket_acl" "bucket_acl" {
# depends_on = [
# aws_s3_bucket_ownership_controls.bucket_ownership_controls,
# aws_s3_bucket_public_access_block.my_bucket_public_access_block
# ]
# bucket = aws_s3_bucket.portfolio-bucket.id
# acl = "public-read"
# }
################################
# Create a bucket policy to allow read access only from CloudFront
resource "aws_s3_bucket_policy" "portfolio_is_bucket_policy" {
depends_on = [
aws_s3_bucket.portfolio_is_bucket,
aws_s3_bucket_public_access_block.my_bucket_public_access_block,
aws_cloudfront_origin_access_identity.origin_access_identity
]
bucket = aws_s3_bucket.portfolio_is_bucket.id
policy = jsonencode({
Version = "2012-10-17",
Statement = [
{
Sid = "PublicReadGetObject",
Effect = "Allow",
Principal = {
AWS = "${aws_cloudfront_origin_access_identity.origin_access_identity.iam_arn}" # The ARN of the CloudFront origin access identity
},
Action = "s3:GetObject",
Resource = "${aws_s3_bucket.portfolio_is_bucket.arn}/*",
},
],
})
}
################################
# Allow public read access to the bucket from any IP address | We do not want that
# resource "aws_s3_bucket_policy" "portfolio-bucket_policy" {
# depends_on = [
# aws_s3_bucket.portfolio-bucket,
# aws_s3_bucket_public_access_block.my_bucket_public_access_block
# ]
# bucket = aws_s3_bucket.portfolio-bucket.id
# policy = jsonencode({
# Version = "2012-10-17",
# Statement = [
# {
# Sid = "PublicReadGetObject",
# Effect = "Allow",
# Principal = "*",
# Action = "s3:GetObject",
# Resource = "${aws_s3_bucket.portfolio-bucket.arn}/*",
# },
# ],
# })
# }
################################
# Enable the bucket to host a static website
resource "aws_s3_bucket_website_configuration" "portfolio_is_website" {
depends_on = [
aws_s3_bucket.portfolio_is_bucket
]
bucket = aws_s3_bucket.portfolio_is_bucket.id
index_document {
suffix = "index.html"
}
error_document {
key = "index.html"
}
}
# Create an origin access identity to allow CloudFront to reach the bucket
resource "aws_cloudfront_origin_access_identity" "portfolio_is_origin_access_identity" {
comment = "Allow CloudFront to reach the bucket"
}
# Create a CloudFront distribution to serve the static website
resource "aws_cloudfront_distribution" "portfolio_is_cloudfront" {
# Describes the origin of the files that you want CloudFront to distribute
origin {
domain_name = aws_s3_bucket.portfolio_is_bucket.bucket_regional_domain_name
origin_id = aws_s3_bucket.portfolio_is_bucket.id # unique identifier for the origin
s3_origin_config {
origin_access_identity = aws_cloudfront_origin_access_identity.portfolio_is_origin_access_identity.cloudfront_access_identity_path
}
}
enabled = true # enable cloud front distribution directly after creation
is_ipv6_enabled = true # enable IPv6 support
default_root_object = "index.html" # default root object to serve when a request is made to the root domain
default_cache_behavior {
allowed_methods = ["GET", "HEAD", "OPTIONS"] # HTTP methods that CloudFront processes and forwards to the origin
cached_methods = ["GET", "HEAD"] # HTTP methods for which CloudFront caches responses
target_origin_id = aws_s3_bucket.portfolio_is_bucket.id
# Forward the query string to the origin that is associated with this cache behavior
forwarded_values {
query_string = false
cookies {
forward = "none"
}
}
viewer_protocol_policy = "redirect-to-https" # HTTP and HTTPS requests are automatically redirected to HTTPS
min_ttl = 0 # minimum amount of time that you want objects to stay in a CloudFront cache
default_ttl = 3600 # default amount of time (in seconds) that you want objects to stay in CloudFront caches
max_ttl = 86400 # maximum amount of time (in seconds) that you want objects to stay in CloudFront caches
}
# Allow cloudfront to use default certificate for ssl
viewer_certificate {
cloudfront_default_certificate = true
}
# Define restrictions on the geographic distribution of your content
restrictions {
geo_restriction {
restriction_type = "none"
}
}
tags = {
Name = "portfolio-cloudfront-nextjs-is"
}
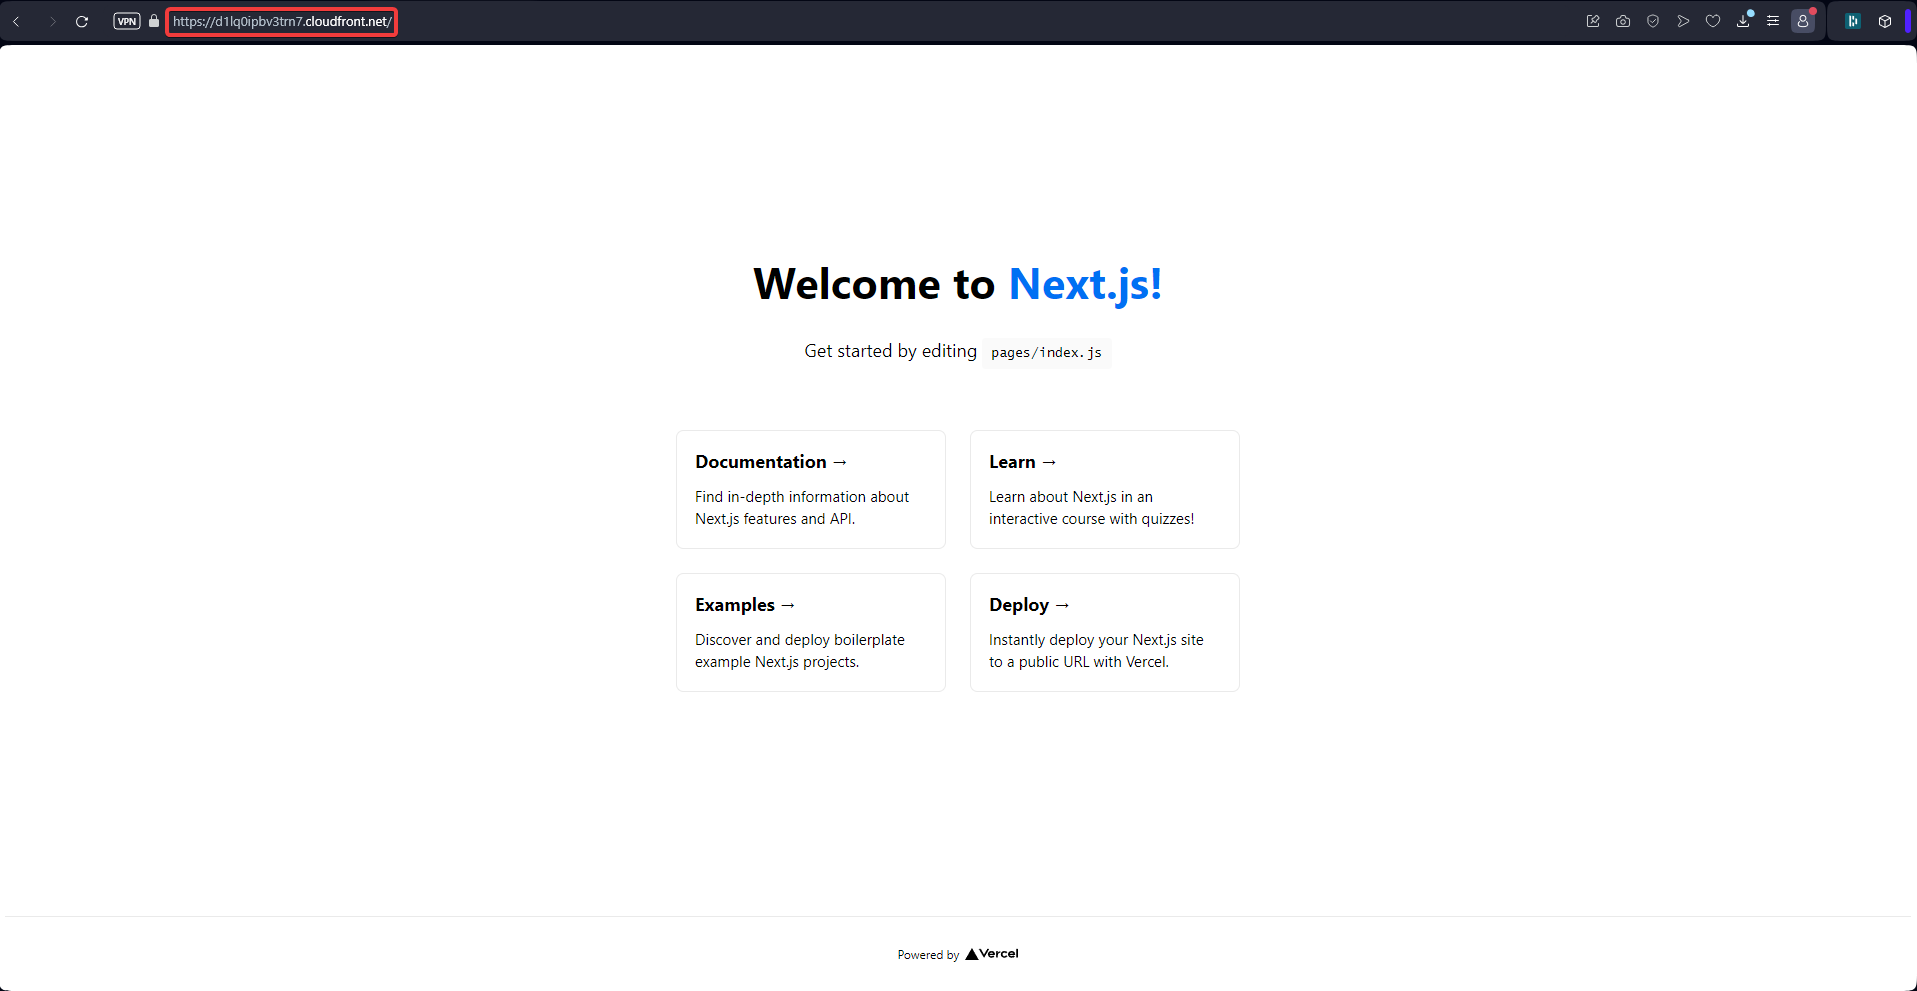
}We need to apply the configuration using Terraform. CloudFront can take some time to be created. Then we just to need to build our next-js application using :
npm run buildWe need to copy all the content in the out folder created to our bucket.
Finally, We can confirm that only cloudfront can access s3 files.
9 - Conclusion | Best practices
Write name between quotes, use underscore instead of dash and do not include resource type in the resource name :
resource "aws_s3_bucket" "portfolio" {}if we use terraform destroy we have to delete all objects within our bucket before.